Hi everyone! Christmas is quickly approaching so I thought I'd do a quick post to show you my Christmas themed nails and how I did them!
Step 1: Paint your nails all black.
Step 2: Draw a white oval leaving some black visible either side
Step 3: Use a dotting tool to make the white of the eyes and a slightly smaller one for the blacks
Step 4: Use a dotting tool to do the orange of the penguins feet then either using a dotting tool making three small dots in a triangle to make the beak or use a brush!
Hope you liked this Christmas themed post! Let me know what Christmassy designs you've got on your nails this year and if you haven't yet maybe this will give you some inspiration!
Showing posts with label White. Show all posts
Tuesday, 23 December 2014
Christmas Penguin Nails
Monday, 17 March 2014
Nail Art - Polka Dots
Hi everyone! So I know I normally do just reviews of different nail varnishes I was thinking about being a little more adventurous and trying out different nail art styles as series of blog posts, so I thought I would start off simple with polka dots! For my birthday my sister got me a set of dotting tools which vary in size so you can get tiny dots and huge ones! I love the design of the tools them self because you can twist them around and it looks really cool.
Personally I think dots on nails look best when it is white dots on top of colour so I went for the classic black and white polka dot. I couldn't decide whether black dots on a white base; or white dots on a black base would look better so I incorporated a bit of both with an accent nail.
So I started by applying my base coat as I always get a bit nervous when I'm using very dark colours on my nails as I've had a lot of bad experience with my nails staining. I used my Sally Hansen one as it drys so quickly!
Then I applied my base white colour to 4 of my nails and then I painted my ring finger nail with a black base to create an accent nail by inverting the colours. Both nail varnishes are from NYC color and are £2.49.
I applied a second coat of both nail vanishes because I felt the white was a bit patchy and weak with only one coat and I needed it to stand out. Although the black didn't really need a second coat I thought I might as well!
Now for the fun part! I put a blob of the same white nail vanish I had used as a base onto a bit of paper and I read that it made the dots look a lot better rather than trying to paint onto the dotting tool. I chose the largest ball size because I did want quite big polka dots. I dipped it at 90 to the paper straight into the polish and then did the first few dots on my accent nail. Obviously after 1 or 2 you will need some more polish on your dotter so just dip it back in.
It's important to clean your dotting tools because they are made of metal so you don't want them to rust or end up with dried polish on the end. I then did exactly the same putting a blob of black nail varnish onto the a paper and then dotted the remaining 8 nails.
Personally I think dots on nails look best when it is white dots on top of colour so I went for the classic black and white polka dot. I couldn't decide whether black dots on a white base; or white dots on a black base would look better so I incorporated a bit of both with an accent nail.
So I started by applying my base coat as I always get a bit nervous when I'm using very dark colours on my nails as I've had a lot of bad experience with my nails staining. I used my Sally Hansen one as it drys so quickly!
Then I applied my base white colour to 4 of my nails and then I painted my ring finger nail with a black base to create an accent nail by inverting the colours. Both nail varnishes are from NYC color and are £2.49.
I applied a second coat of both nail vanishes because I felt the white was a bit patchy and weak with only one coat and I needed it to stand out. Although the black didn't really need a second coat I thought I might as well!
Now for the fun part! I put a blob of the same white nail vanish I had used as a base onto a bit of paper and I read that it made the dots look a lot better rather than trying to paint onto the dotting tool. I chose the largest ball size because I did want quite big polka dots. I dipped it at 90 to the paper straight into the polish and then did the first few dots on my accent nail. Obviously after 1 or 2 you will need some more polish on your dotter so just dip it back in.
It's important to clean your dotting tools because they are made of metal so you don't want them to rust or end up with dried polish on the end. I then did exactly the same putting a blob of black nail varnish onto the a paper and then dotted the remaining 8 nails.
I then sealed it all with my Barry M top coat and tidied up all the bits that went on my skin and they were all done!
I love how they look and got loads of compliments on them today. I think they work really well because they go with everything and look really classic. Dotting your nails is probably the easiest from of nail art so if you don't already have nail dotting tool I would recommend you getting some as they are really cheap if you do a search on Ebay or Amazon. If you don't want to buy some you could always use the head of a pin but I'm not sure it will work as well. Let me know if you think the nail art series is a good idea and if you love the polka dot look as much as I do! Thanks for reading!
Sunday, 19 January 2014
Review & Swatches of 'Maybelline Color Show Street Artist' in '04 Alley Attitude'
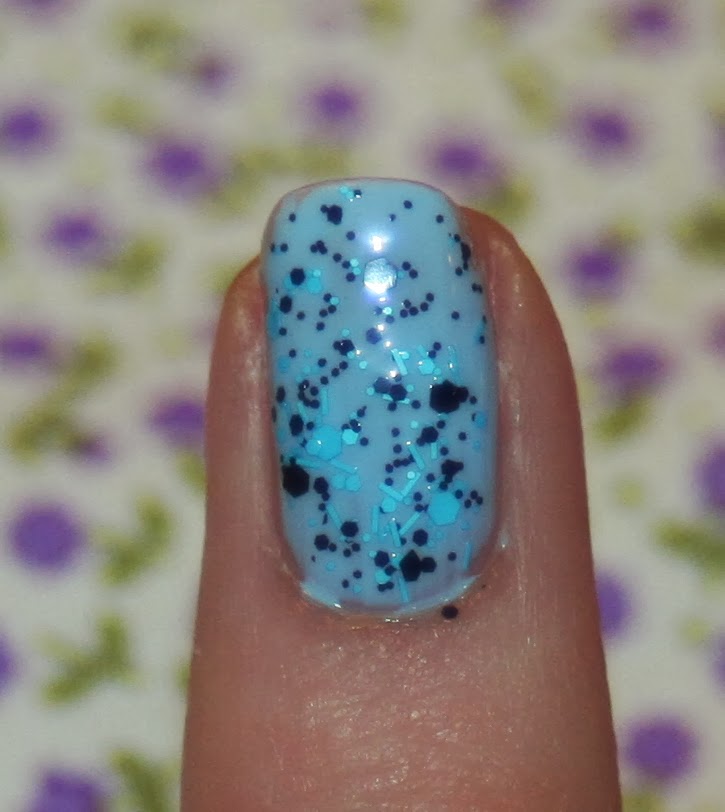
Hi everyone! So I was in town just planning to pick up some paper for school but of course I had to pop into Superdrug as I was walking past. I had a quick scan of the make up sections and I came across the Maybelline counter where they were promoting a nail varnish which looked really interesting so of course I had to pick one up. There were 4 colours but I thought I would just try one so I picked up the blue one for £3.99!
So I wasn't exactly sure what colour to use as my base colour as this nail varnish is a top coat, so I had a little look on some other peoples blogs and popular opinion was to use grey. However, despite having nearly 100 nail varnishes I don't actually have a grey so I did some swatches on some different colours!
So this is what it looks like on a plain nail without a base coat. Obviously I wouldn't wear it out like this but it shows you what the nail varnish looks like.
Firstly, I tried it with a black base colour which I think makes the the blue really stand out but you loose the effect of the black parts in the polish which I guess kind of defeats the point of the nail polish being two toned.
I then gave it a go on a light blue, similar to the colour of the blue parts in the polish, but again this had the same effect as using black as my base colour.
I thought a darker blue might work, but again it didn't look great as the effect kind of blended in which in my opinion is not the point of this nail varnish.
Similarly, using a pale purple just didn't make the effect stand out and the blue and purple just didn't compliment each other well.
Finally I tried white, as this was the closest colour to grey I had, and I think it looked amazing!
From a distance it looks like you've manually splattered nail polish on your nails (which is something I have tried but the effect never seems to turn out the way I want it to!) So many people asked me at school how I did it and were shocked to find out it was quite literally a top coat!
In the collection there is also a red, green and a sort of whitey purpley coloured one in addition to the blue one I bought. I would definitely recommend you get one and try it out for yourself! They look so fun and require minimal effort which is always a plus when you don't have a great deal of time to spare!
Although it in principal is the same as any confetti or glitter top coat I think it looks so much better and I really like that there are a variety of sized pieces making it look like more realistic paint splatters!
Let me know if what you think of this new look and if you have tried it out! Thanks for reading!
So I wasn't exactly sure what colour to use as my base colour as this nail varnish is a top coat, so I had a little look on some other peoples blogs and popular opinion was to use grey. However, despite having nearly 100 nail varnishes I don't actually have a grey so I did some swatches on some different colours!
So this is what it looks like on a plain nail without a base coat. Obviously I wouldn't wear it out like this but it shows you what the nail varnish looks like.
Firstly, I tried it with a black base colour which I think makes the the blue really stand out but you loose the effect of the black parts in the polish which I guess kind of defeats the point of the nail polish being two toned.
I then gave it a go on a light blue, similar to the colour of the blue parts in the polish, but again this had the same effect as using black as my base colour.
I thought a darker blue might work, but again it didn't look great as the effect kind of blended in which in my opinion is not the point of this nail varnish.
Similarly, using a pale purple just didn't make the effect stand out and the blue and purple just didn't compliment each other well.
Finally I tried white, as this was the closest colour to grey I had, and I think it looked amazing!
From a distance it looks like you've manually splattered nail polish on your nails (which is something I have tried but the effect never seems to turn out the way I want it to!) So many people asked me at school how I did it and were shocked to find out it was quite literally a top coat!
In the collection there is also a red, green and a sort of whitey purpley coloured one in addition to the blue one I bought. I would definitely recommend you get one and try it out for yourself! They look so fun and require minimal effort which is always a plus when you don't have a great deal of time to spare!
Although it in principal is the same as any confetti or glitter top coat I think it looks so much better and I really like that there are a variety of sized pieces making it look like more realistic paint splatters!
Let me know if what you think of this new look and if you have tried it out! Thanks for reading!
Tuesday, 27 August 2013
Review of 'MUA Nail Constellation' in 'Pisces'
Hi everyone! So as you know I normally just do plain nail varnish reviews but I thought I would try something different! I'm also thinking of doing some patterned nail tutorials and things like that in the future, if you are interested in that?
This isn't mine by the way, it's actually my sisters and she kindly let me borrow it so I could try it out. I believe you can buy them at £3 from MUA which is a brand you can only find online or in Superdrug and I'd not heard of this brand until pretty recently but they basically do super cheap make up and from what I've heard most of it is actually pretty good!
So I am using the colour Pisces (which is actually my star sign) but I think I am right in saying there are 4 other ones in a variety of colours. This one is mainly green with bits of pearly pink and white infused into the mixture.
I have already painted my nails with a colour I found to match the green balls best which I got from the NYC and you can read a review of that HERE . I didn't have any that matched the pearl or white but I think it would have looked more effective if I had been able to use a pearl colour as my base.
So what you have to do is paint your desired nail with your base colour and whilst it is still wet and tacky pour the small balls onto you nail. This can be a bit messy so make sure you have something underneath to catch the mass of stay ones! Once your nail looks fully covered gently push the balls down onto your nail and then apply a clear top coat on top to secure them.
I only chose to do one nail thus acting as an accent nail because I had never tried anything like this and thought it might be a little bit too much if I did all my nails like this!
Although the bottle is very well designed to pouring the balls out it is a bit tricky getting them back in. For some reason I couldn't remove the funnel part of the bottle as you are supposed to do so I have to try and pour the stray balls back through the tiny hole they came out of! I managed to get there in the end but it was a bit annoying.I'm sure by removing the funnel it is a lot easier to pour the balls back in but I was just unable to do so.
I quite like the overall effect although I did find it strange to have things sticking out of my nail! Considering the price of £3 I would recommend this as it is a great way to jazz up your nails although personally I would try a different colour out as I don't think this one was right for me!
Let me know if what you do to spice up your nails and also if you would be interested in me doing some tutorial/nail pattern design things in the future! Thanks for reading.
This isn't mine by the way, it's actually my sisters and she kindly let me borrow it so I could try it out. I believe you can buy them at £3 from MUA which is a brand you can only find online or in Superdrug and I'd not heard of this brand until pretty recently but they basically do super cheap make up and from what I've heard most of it is actually pretty good!
So I am using the colour Pisces (which is actually my star sign) but I think I am right in saying there are 4 other ones in a variety of colours. This one is mainly green with bits of pearly pink and white infused into the mixture.
I have already painted my nails with a colour I found to match the green balls best which I got from the NYC and you can read a review of that HERE . I didn't have any that matched the pearl or white but I think it would have looked more effective if I had been able to use a pearl colour as my base.
So what you have to do is paint your desired nail with your base colour and whilst it is still wet and tacky pour the small balls onto you nail. This can be a bit messy so make sure you have something underneath to catch the mass of stay ones! Once your nail looks fully covered gently push the balls down onto your nail and then apply a clear top coat on top to secure them.
| My whole nail is covered! Honest! It's just that the green balls blend in the my base colour |
Although the bottle is very well designed to pouring the balls out it is a bit tricky getting them back in. For some reason I couldn't remove the funnel part of the bottle as you are supposed to do so I have to try and pour the stray balls back through the tiny hole they came out of! I managed to get there in the end but it was a bit annoying.I'm sure by removing the funnel it is a lot easier to pour the balls back in but I was just unable to do so.
| Excess balls |
Let me know if what you do to spice up your nails and also if you would be interested in me doing some tutorial/nail pattern design things in the future! Thanks for reading.
Labels:
Accent Nail,
Beauty,
Blog,
Blue,
Cheap,
Cosmetics,
Cute,
Green,
MUA,
Nail,
Nail Art,
Nail Constellation,
Nail Polish,
Nail Varnish,
Nails,
NYC,
Pink,
Pisces,
Review,
White
Subscribe to:
Posts (Atom)