Showing posts with label Nail Art. Show all posts

Friday, 13 March 2015

Red Nose Day 2015!!

Hi everyone! So today, as I'm sure you're aware if you live in the UK, is Red Nose Day which is basically a day where we raise money for charity and help to transform the lives of people in the UK and across Africa.


As with every year at school we have a mufti day where you bring in £1 to not wear school uniform for the day, but in sixth form we take it a step further and have a dress up day! This year the theme was TV and film characters so myself and my friend decided to go as Sam and Dean Winchester (Supernatural!) but there was a huge variety or group, couples and individual costumes ranging from the toy soldiers from Toy Story to the Powerpuff girls, the Tardis to Jesse Pinkman! It's all just a bit of fun! 


"Look at these male modelling sons of bitches - nice Blue Steel Sam!"
I also picked up some really cute nail wraps from Sainsburys for £2 and I only realised when I opened them that as well as getting 14 wraps you also got a collection of small red nose stickers which I didn't use this time but at least I'm prepared for next time! I might even be able to reuse the wraps because they're quite long so I can probably use the other half if my nails are short!


Hope you enjoyed reading how I've been doing my bit - So let me know what you've been up to to raise money for Comic Relief! 

Tuesday, 23 December 2014

Christmas Penguin Nails

Hi everyone! Christmas is quickly approaching so I thought I'd do a quick post to show you my Christmas themed nails and how I did them!


Step 1: Paint your nails all black.


Step 2: Draw a white oval leaving some black visible either side


Step 3: Use a dotting tool to make the white of the eyes and a slightly smaller one for the blacks


Step 4: Use a dotting tool to do the orange of the penguins feet then either using a dotting tool making three small dots in a triangle to make the beak or use a brush!


Hope you liked this Christmas themed post! Let me know what Christmassy designs you've got on your nails this year and if you haven't yet maybe this will give you some inspiration!


Sunday, 14 December 2014

Born Pretty Store Stamping Plate Review

DISCLAIMER: I've been sent this products by Born Pretty Store for my honest review which is exactly what I've given you!

Hi everyone! So a few weeks back Allison from Born Pretty Store contacted me asking if I would like to review some of their products on here which was very exciting for me as I've had this blog for just over a year now and this is the first set of products that have been sent to me! I've read a couple of other reviews and have looked at the site before and what was such a pleasant surprise to me was the price - everything is so reasonably priced! From placing my order to receiving it took just under a month but their delivery times vary based on your location!


So I got to choose 3 stamping plates from their collection and I picked these!

'Charming Spring Nail Art Stamp Template Image Plate BORN PRETTY 24 (#17203)'


'Starfish & Shell Theme Nail Art Stamp Template Image Plate BORN PRETTY 10 (#16857)'


'Butterfly Nail Art Stamp Template Image Plate BORN PRETTY 22 (#17267)'


So I already had the stamper and scraper (although you can just use an old credit card for the scraping) but I've never used a stamping plate before. I'm not going to lie, it took me a while to realise that you have to remove the blue seal as it's just a protective layer!!! I was wondering for a bit why on earth it wasn't working!


So first I tried out the Spring themed one which is only £1,90! This is I chose this one because I saw the owl on it which I thought look really cute as I'm 'Little Owl' at a Brownie unit so I take any opportunity to get owl themed things!


I then tried out the Starfish and Shell themed one which is £1.27! I picked this one because I really like the mehendi style waves and it will be perfect for those beach days (if the rain ever goes!) 


And saving my favourite until last - the Butterfly themed plate for an absolute steal at £0.63!!!!! I absolutely loved the detail of the butterflies and the patterned flower section is just so pretty! I cannot wait for this winter weather to go so I can start wearing bright summery colours again because this would look perfect!


I will defiantly be using these again because it so simple to do but really gives you nails an extra something! With free shipping and such adorable products I will without a doubt placing an order of my own! If you like any of the plates I chose or there's something else that takes you fancy  you can use my 10% off code on your next order!


Hope you enjoyed this review - let me know what you think! Have you used plates before? Which one is your favourite? Thanks for reading!


Sunday, 1 June 2014

World Cup Nail Art - Ivory Coast (Côte d’Ivoire)

Hi everyone! So not too long ago I got an email from Emily over at Nailsxo asking if I wanted to join a World Cup Nail Art competition she was running. Now, I don't really know anything about football and I haven't really done much nail art before but that's never stopped me before! The idea was once you'd been allocated your country you had to create a manicure design that reflected that nation and I was given the Ivory Coast!


Again, I have to admit I knew very little about Ivory Coast so of course I used all my powers, by which I mean Google, to research the country itself as well as the culture so I wanted to share a couple of facts I found out!


Location


The official language spoken on the Ivory Coast is French.

As of 2012, the population stood at 22 million making it the 54th largest population in the world.

Average life expectancy is 57 years old. (It's 80 in the UK!)

And it has many names! 
  • Conventional long form: Republic of Cote d'Ivoire
  • Conventional short form: Cote d'Ivoire
  • Local long form: Republique de Cote d'Ivoire
  • Local short form: Cote d'Ivoire
  • Formerly known as: Ivory Coast
So bearing that all in mind I set on thinking up a couple of designs that I could create and here is the finished design!


I based the design on my thumb to mimic the coat of arms coloured with the colours of the flag!


On my pinky I tried to mimic the referee kit!


And then on my remaining three nails I went with the slightly easy option of the flag but I think it looks very effective in contrast to the other nails!


So I hope you enjoyed reading this slightly different blog post and I'll keep practicing my nail art and maybe write another post when I improve because my hand wouldn't stop shaking drawing those lines! Thanks for reading!

Sunday, 19 January 2014

Review & Swatches of 'Maybelline Color Show Street Artist' in '04 Alley Attitude'

Hi everyone! So I was in town just planning to pick up some paper for school but of course I had to pop into Superdrug as I was walking past. I had a quick scan of the make up sections and I came across the Maybelline counter where they were promoting a nail varnish which looked really interesting so of course I had to pick one up. There were 4 colours but I thought I would just try one so I picked up the blue one for £3.99!


So I wasn't exactly sure what colour to use as my base colour as this nail varnish is a top coat, so I had a little look on some other peoples blogs and popular opinion was to use grey. However, despite having nearly 100 nail varnishes I don't actually have a grey so I did some swatches on some different colours!

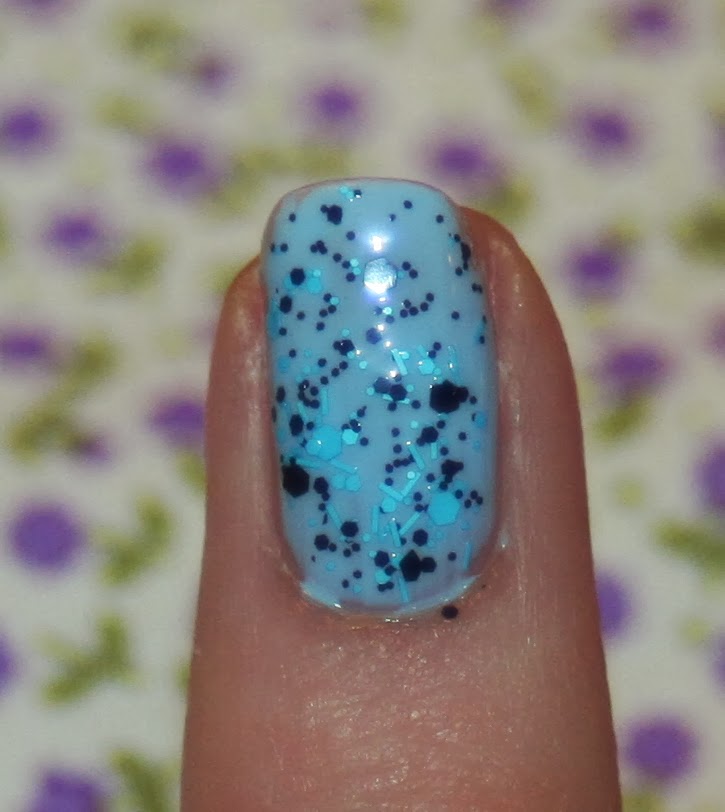
So this is what it looks like on a plain nail without a base coat. Obviously I wouldn't wear it out like this but it shows you what the nail varnish looks like.


Firstly, I tried it with a black base colour which I think makes the the blue really stand out but you loose the effect of the black parts in the polish which I guess kind of defeats the point of the nail polish being two toned.

I then gave it a go on a light blue, similar to the colour of the blue parts in the polish, but again this had the same effect as using black as my base colour.


I thought a darker blue might work, but again it didn't look great as the effect kind of blended in which in my opinion is not the point of this nail varnish.


Similarly, using a pale purple just didn't make the effect stand out and the blue and purple just didn't compliment each other well.


Finally I tried white, as this was the closest colour to grey I had, and I think it looked amazing!


From a distance it looks like you've manually splattered nail polish on your nails (which is something I have tried but the effect never seems to turn out the way I want it to!) So many people asked me at school how I did it and were shocked to find out it was quite literally a top coat!


In the collection there is also a red, green and a sort of whitey purpley coloured one in addition to the blue one I bought. I would definitely recommend you get one and try it out for yourself! They look so fun and require minimal effort which is always a plus when you don't have a great deal of time to spare!

Although it in principal is the same as any confetti or glitter top coat I think it looks so much better and I really like that there are a variety of sized pieces making it look like more realistic paint splatters!

Let me know if what you think of this new look and if you have tried it out! Thanks for reading!

Wednesday, 18 September 2013

Review of 'Instant Nail Effects Crackle' in 'Black Magic'

Hi everyone! So I thought I would try a new thing out on my nails! I got this crackle effect last Chirstmas but I always thought it looked a bit tacky (I still do if you match it with the wrong colour) so I haven't actually tried it until now. I think you can buy it for £3.99 which is the average price for any effect nail varnish Barry M has.

I have been loving the rockish look lately of mixing black with gold and I really wanted to see if I could apply this to my nails. First I painted my nails gold (which I wrote about HERE) which acted as my base colour. On it's own, I'm not too sure about having full gold nails so I probably wouldn't use it without placing some sort of effect over the top.


I then applied the first coat of the crackle effect whilst the gold was still drying (I'd left it about 5-10 minutes but it was still a little tacky). I wasn't quite sure if I should be applying it with a thin coat or a thick. The first nail I did, I painted a very thin coat on, but then found I needed more polish to cover the whole nail. However, by the time I had got some more on the brush the thin strip had already began to crack. So, my advice would be to make sure you have plenty of varnish on your brush and just paint a slightly thick coat over the top of your chosen base colour.


The cracking started almost instantly and it only took about 1 minute for the whole thing to be done. I continued painting all my nails until my whole hand was done.


I like that the crackle is random so every nail is different, but I found, especially with my pinky, that the crackle had basically split into 4 sections. Personally, I think this works best when there are lots of thin cracks all over the nail.

I then added a top coat to give it a lovely shine as the crackle is kind of matt. I LOVE how my nails look as I think it is quite edgy and something different than just a plain colour. I've received quite a few compliments on my nails this week because of it (including a couple from some guys!). I think it works really well with the gold as a base colour, but you definitely have to be careful what you use as a base colour because obviously some will look great and some will just look plain tacky.


I would recommend this product as I think it livens up your nails and although I haven't tried the other colours (I think I'm right in saying you can also get it in purple, pink, blue, white and gold?) I think that black is probably the best colour to get, as in theory it will go with a wider variety of base colours!

Let me know what you think of the crackle effect! Thank you for reading! (: